Comprehensive Guide to Residential Vehicle Polymer Sealants: Achieving Long-Lasting Shine and Protection
Introduction to Residential Vehicle Polymer Sealants
Maintaining the appearance and integrity of your recreational vehicle—be it a motorhome, camper, or caravan—requires more than just regular cleaning. One of the most effective ways to ensure your vehicle remains protected from environmental elements, retains its glossy finish, and simplifies future cleaning is through the application of a high-quality Wohnmobil Politursiegelung. This process involves applying a specialized polymer sealant designed to form a durable, protective layer over the vehicle’s surface, shielding it from water, dirt, UV rays, and pollutants. In this comprehensive guide, we delve into the nuances of residential vehicle polymer sealants, focusing on their benefits, application processes, maintenance, and how they compare with alternative protection methods.
Understanding Residential Vehicle Polymer Sealants
What is a Polymer Sealant for Recreational Vehicles?
A polymer sealant, often referred to as a “Politursiegelung” in German terminology, is a chemically engineered coating that bonds with the surface of your vehicle’s exterior. Unlike traditional waxes, which provide a temporary glossy layer, polymer sealants create a semi-permanent or long-lasting protective barrier that enhances gloss while offering robust protection. These sealants are formulated with advanced polymers—such as SiO2 (silicon dioxide)—which form a resilient, hydrophobic surface resistant to water spots, dirt, and UV-induced deterioration.
Advantages of Professional Polymer Sealant Applications
When professionally applied, a residential vehicle polymer sealant can provide:
- Superior Durability: Long-lasting protection—often 12 to 36 months—reducing frequency of reapplication.
- Enhanced Gloss and Clarity: Deep, mirror-like shine that rejuvenates faded surfaces.
- Hydrophobic Effect: Water beads and rolls off, which simplifies cleaning and reduces water spots.
- Protection Against Contaminants: Shields against pollutants, bird droppings, UV damage, and minor scratches.
- Ease of Maintenance: Easier and faster cleaning due to the smooth, non-porous surface.
Choosing the Right Time and Surface Preparation
Timing: When is the Optimal Moment for Applying a Sealant?
The best time to perform a Wohnmobil Politursiegelung is after comprehensive cleaning and decontamination. Ideally, the surface should be free of dirt, grime, and old wax layers. It’s recommended to apply the sealant during a period of moderate weather—ideally overcast, avoiding direct sunlight and avoiding applying in very hot or humid conditions to ensure optimal bonding and curing.
Prepping Your Vehicle for Sealant Application
Proper surface preparation is critical for the longevity and appearance of protection. Key steps include:
- Thorough washing with a gentle, pH-neutral vehicle shampoo to remove surface dirt and grease.
- Decontamination using clay bars or specialized decontamination shampoos to eliminate embedded pollutants.
- Drying with microfiber towels to prevent water spots.
- Inspection for scratches, oxidation, or paint defects that may require polishing prior to sealing (see next section).
Comparing Different Methods for Vehicle Protection
Alternative protective options include traditional waxes, ceramic coatings, and spray sealants. Waxes, while easier to apply, typically offer shorter protection (a few months) and less hydrophobicity. Ceramic coatings (e.g., SiO2-based products) provide superior, longer-lasting protection but often come with higher cost and complexity. Spray sealants may serve as quick fixes but are generally less durable than professional-grade polymer sealants. Selecting the appropriate method depends on your maintenance preferences, budget, and desired durability.
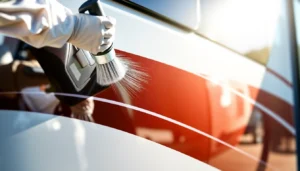
Applying Residential Vehicle Polymer Sealants: Step-by-Step
Preparation: Ensure Optimal Conditions
Before beginning, gather all necessary tools and products: microfiber applicator pads, foam applicators, clean microfiber towels, and the selected sealant product. Confirm environmental conditions are suitable—cool, shaded, and dry.
Application Procedure for Effective Results
- Perform a thorough cleaning: As detailed above, ensure the surface is spotless and dry.
- Inspect for paint defects: Consider polishing areas with minor scratches or oxidation to maximize gloss before sealing.
- Apply the sealant: Using the microfiber or foam applicator, dispense a small amount of product. Work in manageable sections (e.g., one panel at a time).
- Spread evenly: Apply the sealant in a thin, uniform layer using overlapping, circular motions.
- Allow curing time: Typically, 5-10 minutes, depending on product instructions.
- Buff off: Using a clean microfiber towel, gently remove excess product to reveal a high-gloss, hydrophobic surface.
Pro Tips for Uniform Application
- Work in small sections to prevent the product from drying out before buffing.
- Use high-quality microfiber towels for buffing to avoid swirl marks.
- Follow the manufacturer’s instructions regarding curing time and conditions.
- Apply multiple thin layers for enhanced durability and gloss, allowing adequate curing time between coats.
Common Application Errors to Avoid
- Applying in direct sunlight or on hot surfaces, which can cause streaks or uneven curing.
- Using old or contaminated applicators which can introduce dirt and compromise bonding.
- Overapplying—more product does not mean longer protection but can result in streaks and difficulty buffing.
- Ignoring surface defects—sealants bond best on smooth, clean surfaces.
Post-Application Maintenance and Longevity
Maintaining the Protective Layer
To maximize the lifespan of your Wohnmobil Politursiegelung, adhere to a gentle cleaning routine. Use pH-neutral shampoos and microfiber towels like those from the BCC Microfaser Towel series, which are soft and non-abrasive. Avoid automatic car washes with brushes that can scratch the sealant layer.
Regular Cleaning for Durable Protection
Regularly washing the vehicle removes dirt and prevents the buildup of contaminants that can wear down the sealant. Rinsing with water and gentle washing agents ensures the protection remains intact, maintaining the vehicle’s shine and hydrophobic properties.
Reapplying and Boosting the Sealant
Over time, the protective effects diminish due to exposure and washing. For ongoing maximum protection, reapply the sealant as recommended—typically after 12-36 months. For an immediate refresh, use spray sealants or quick detailers that enhance hydrophobicity between full reapplications.
Assessing Success and Optimizing Results
Indicators of a Successful Sealant Application
The effectiveness of your Wohnmobil Politursiegelung can be gauged by:
- Water Beading: Water forms tight, spherical beads and rolls off effortlessly.
- Enhanced Gloss: Surfaces appear deep, shiny, and mirror-like.
- Ease of Cleaning: Dirt and grime are easier to remove, reducing scrubbing efforts.
- Smooth Surface Feel: The exterior feels uniformly sleek and resistant to water spots.
Long-Term Care for Maximum Shine
Maintaining optimal conditions—like parking in shaded areas, avoiding abrasive cleaning tools, and performing regular washings—extends the life of the sealant. Additionally, periodic polishing with compounds like the BCC Power Polish can rejuvenate gloss if necessary.
Customer Experiences and Recommendations
Many users report noticeable improvements in gloss and water runoff after applying a quality Wohnmobil Politursiegelung. For optimal results, manufacturers recommend professional application techniques and diligent maintenance. Feedback indicates that a well-maintained sealant can protect your vehicle for multiple seasons, saving time and money on repairs or repainting.